When I first decided to take on a big project using iron on transfers I looked for a little guidance online on how to proceed and there was only one site I found that was a little bit helpful. That project was a quilt for Christmas with full page pictures of honey’s RC’s and one two page logo in the centre. I thought must be pretty strait forward I guess. It’s not! There are a lot of tips and tricks I’ve picked up along the way. I still use transfers for all of the RC covers I make although I’m looking into silk-screening now but a lot of the custom work I do will still rely on them heavily.
So lets start at the beginning there are three different types, light background (regular), stretchy, and dark background transfers. Also iron on vinyl can be a great choice depending on your application and desired outlook. There are brand name (Avery) and store brand. I’ll try to organize this by type as much as possible but some things are specific to each type and some are more general so you might find it beneficial to read to the end.
First I’ll go through the dark background and stretchy type transfers. To me these are essentially the same thing. Each of these have a transparent ‘background’, preform and attach the same and neither seem to handle stretching that well. The background shows less in between the stretchy ones and the colours can be less vibrant depending on your material. Any tips or instructions basically apply to both. For these you probably want to put them on a lighter background depending on your application. I use these most often (read 1000’s) of times for attaching my black logos of medium dark grey covers. The basics are you want to print them on an inkjet printer but as they attach face down the image must be horizontally flipped which some printers have a setting for. These cost a little more than $1 per sheet and to maximize your value it’s best to try to fill the page. I use mostly larger logos but fill the page with medium and small logos by default as well. To test out how these will preform, stretch and wash I attach my extra logos to many places on pairs of cotton undies as these get a lot of wear and washes pretty quickly. Plus honey loves it when my have his logo all over my nether regions! Neither seem to do any better with stretching and wear but the streachy ones have some sparkle to them that comes off in a few washes so that could be fun. But there are a lot of tips beyond just that!
Firstly, the Avery ones are a bit more expensive but do work just a tiny bit better. Nothing to drastic but they attach and age a bit better especially when ‘aged’ more on that later. Perhaps they handle a few extra washes but nothing major. So if it’s an item you plan on wearing and washing a lot maybe it’s worth the extra. If it’s something just for a pub crawl or a joke it might not be. Either way over time it will start to look a bit shitty. The graphic you put on will attach and stay better if you try to avoid hard corners. If your putting a picture on something consider rounding the corners off with scissors. Hard corners don’t attach and seal as well as smooth curves and will be the first to lift with stretching and washing. The packaging makes a lot of turning off your steam function and leaving your iron on for a while before you start. This is probably not enough to ensure great results. I suggest you empty your iron and let it heat up for awhile before starting this might mean you have to override the auto off feature a few times. If your fabric has been stored some where humid dry it out with repeated ironings or they dryer before starting off. MOISTURE IS NOT YOUR FRIEND! if not it will not seal well (or at all) to the fabric.
Next is the iron temperature. It will say to use the hottest possible setting which is not always the best choice. This will give you the best seal but it may also damage your fabric or cause the image to yellow especially on a white or very light background. Like on the quilt I made below. Some of the fabrics I use are actually very easily heat damaged like taffeta and metallic nylon. It is possible to get a good seal at a lower setting. I recommend filling up that sheet and experimenting with your fabric in order to balance the seal, potential yellowing of the transfer and damaging the fabric. The metallic nylon I use will melt and get holes if ironed at even half heat. You can try a variety of tricks to get the best result. You can but a towel over (or a light cloth), or paper over to minimize the damaging effects on the fabric. To the same end you can also iron with just the tip of the iron at the edges to get the outer bits to seal. You can try to place the image below the fabric and iron down in the back is not showing or less likely to be damaged. Your don’t have to hold it on for the whole time recommended in general. Often melty fabrics take the transfer almost instantly at a very low setting.
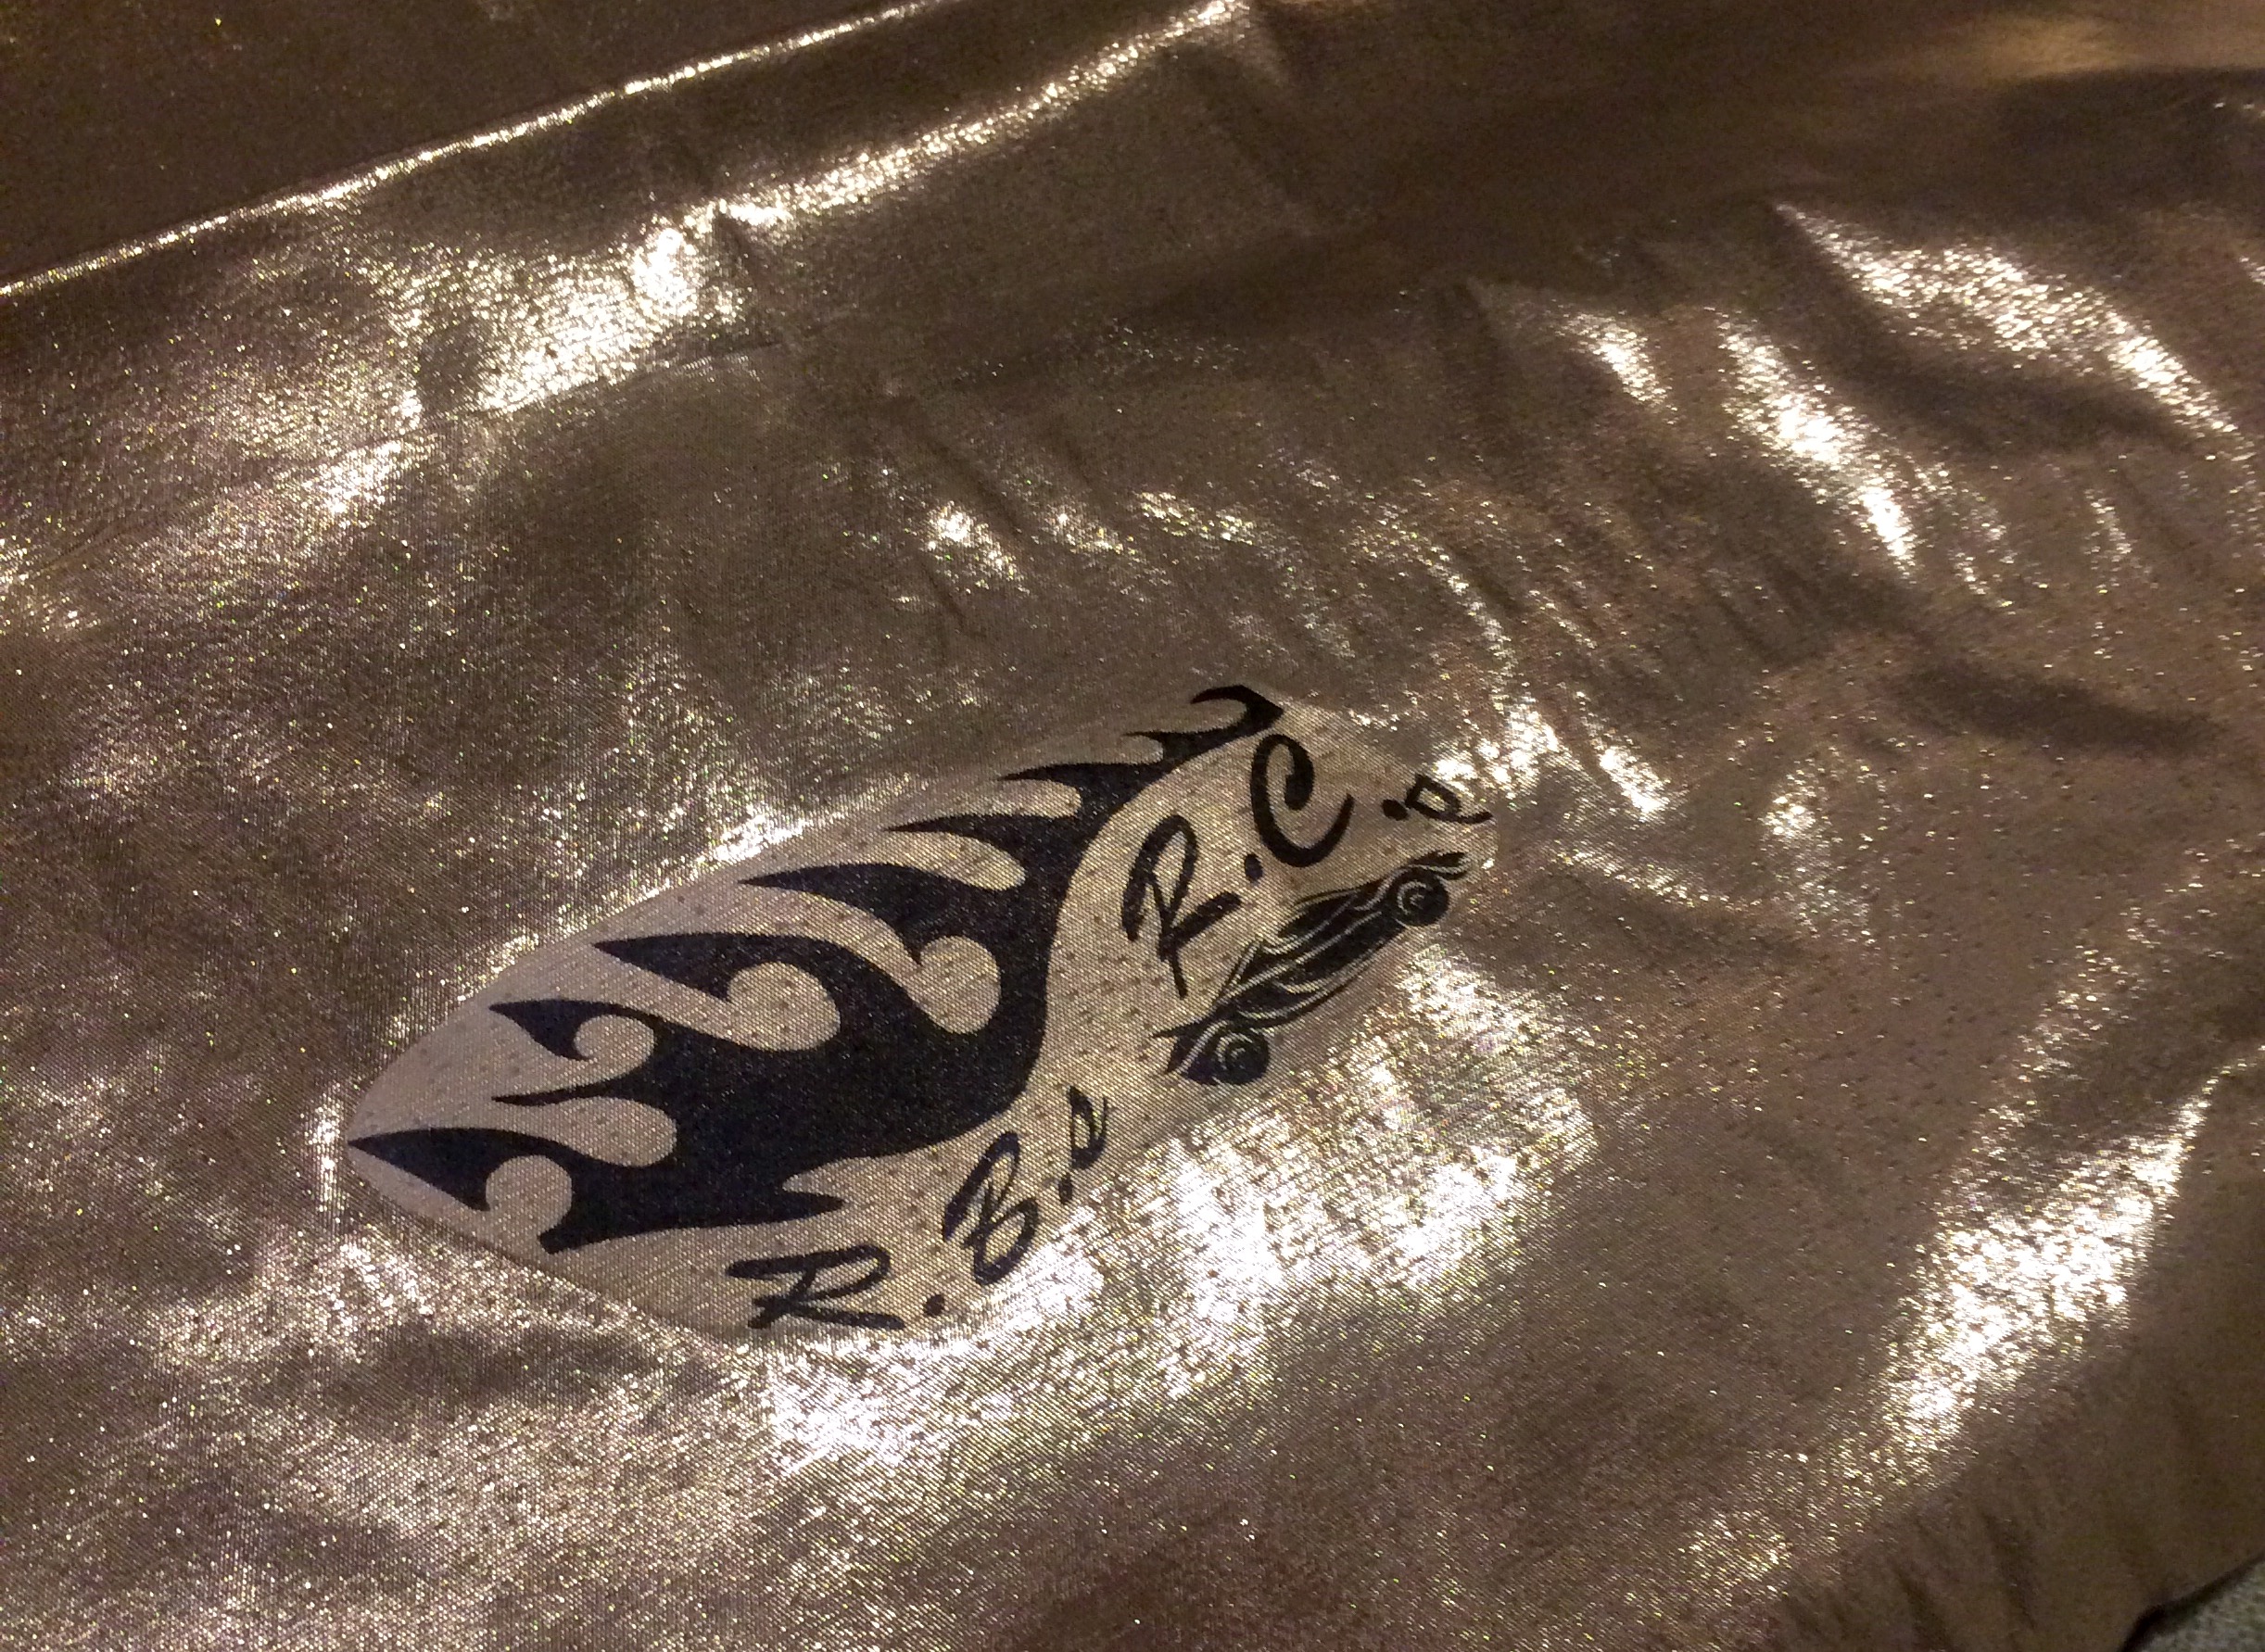
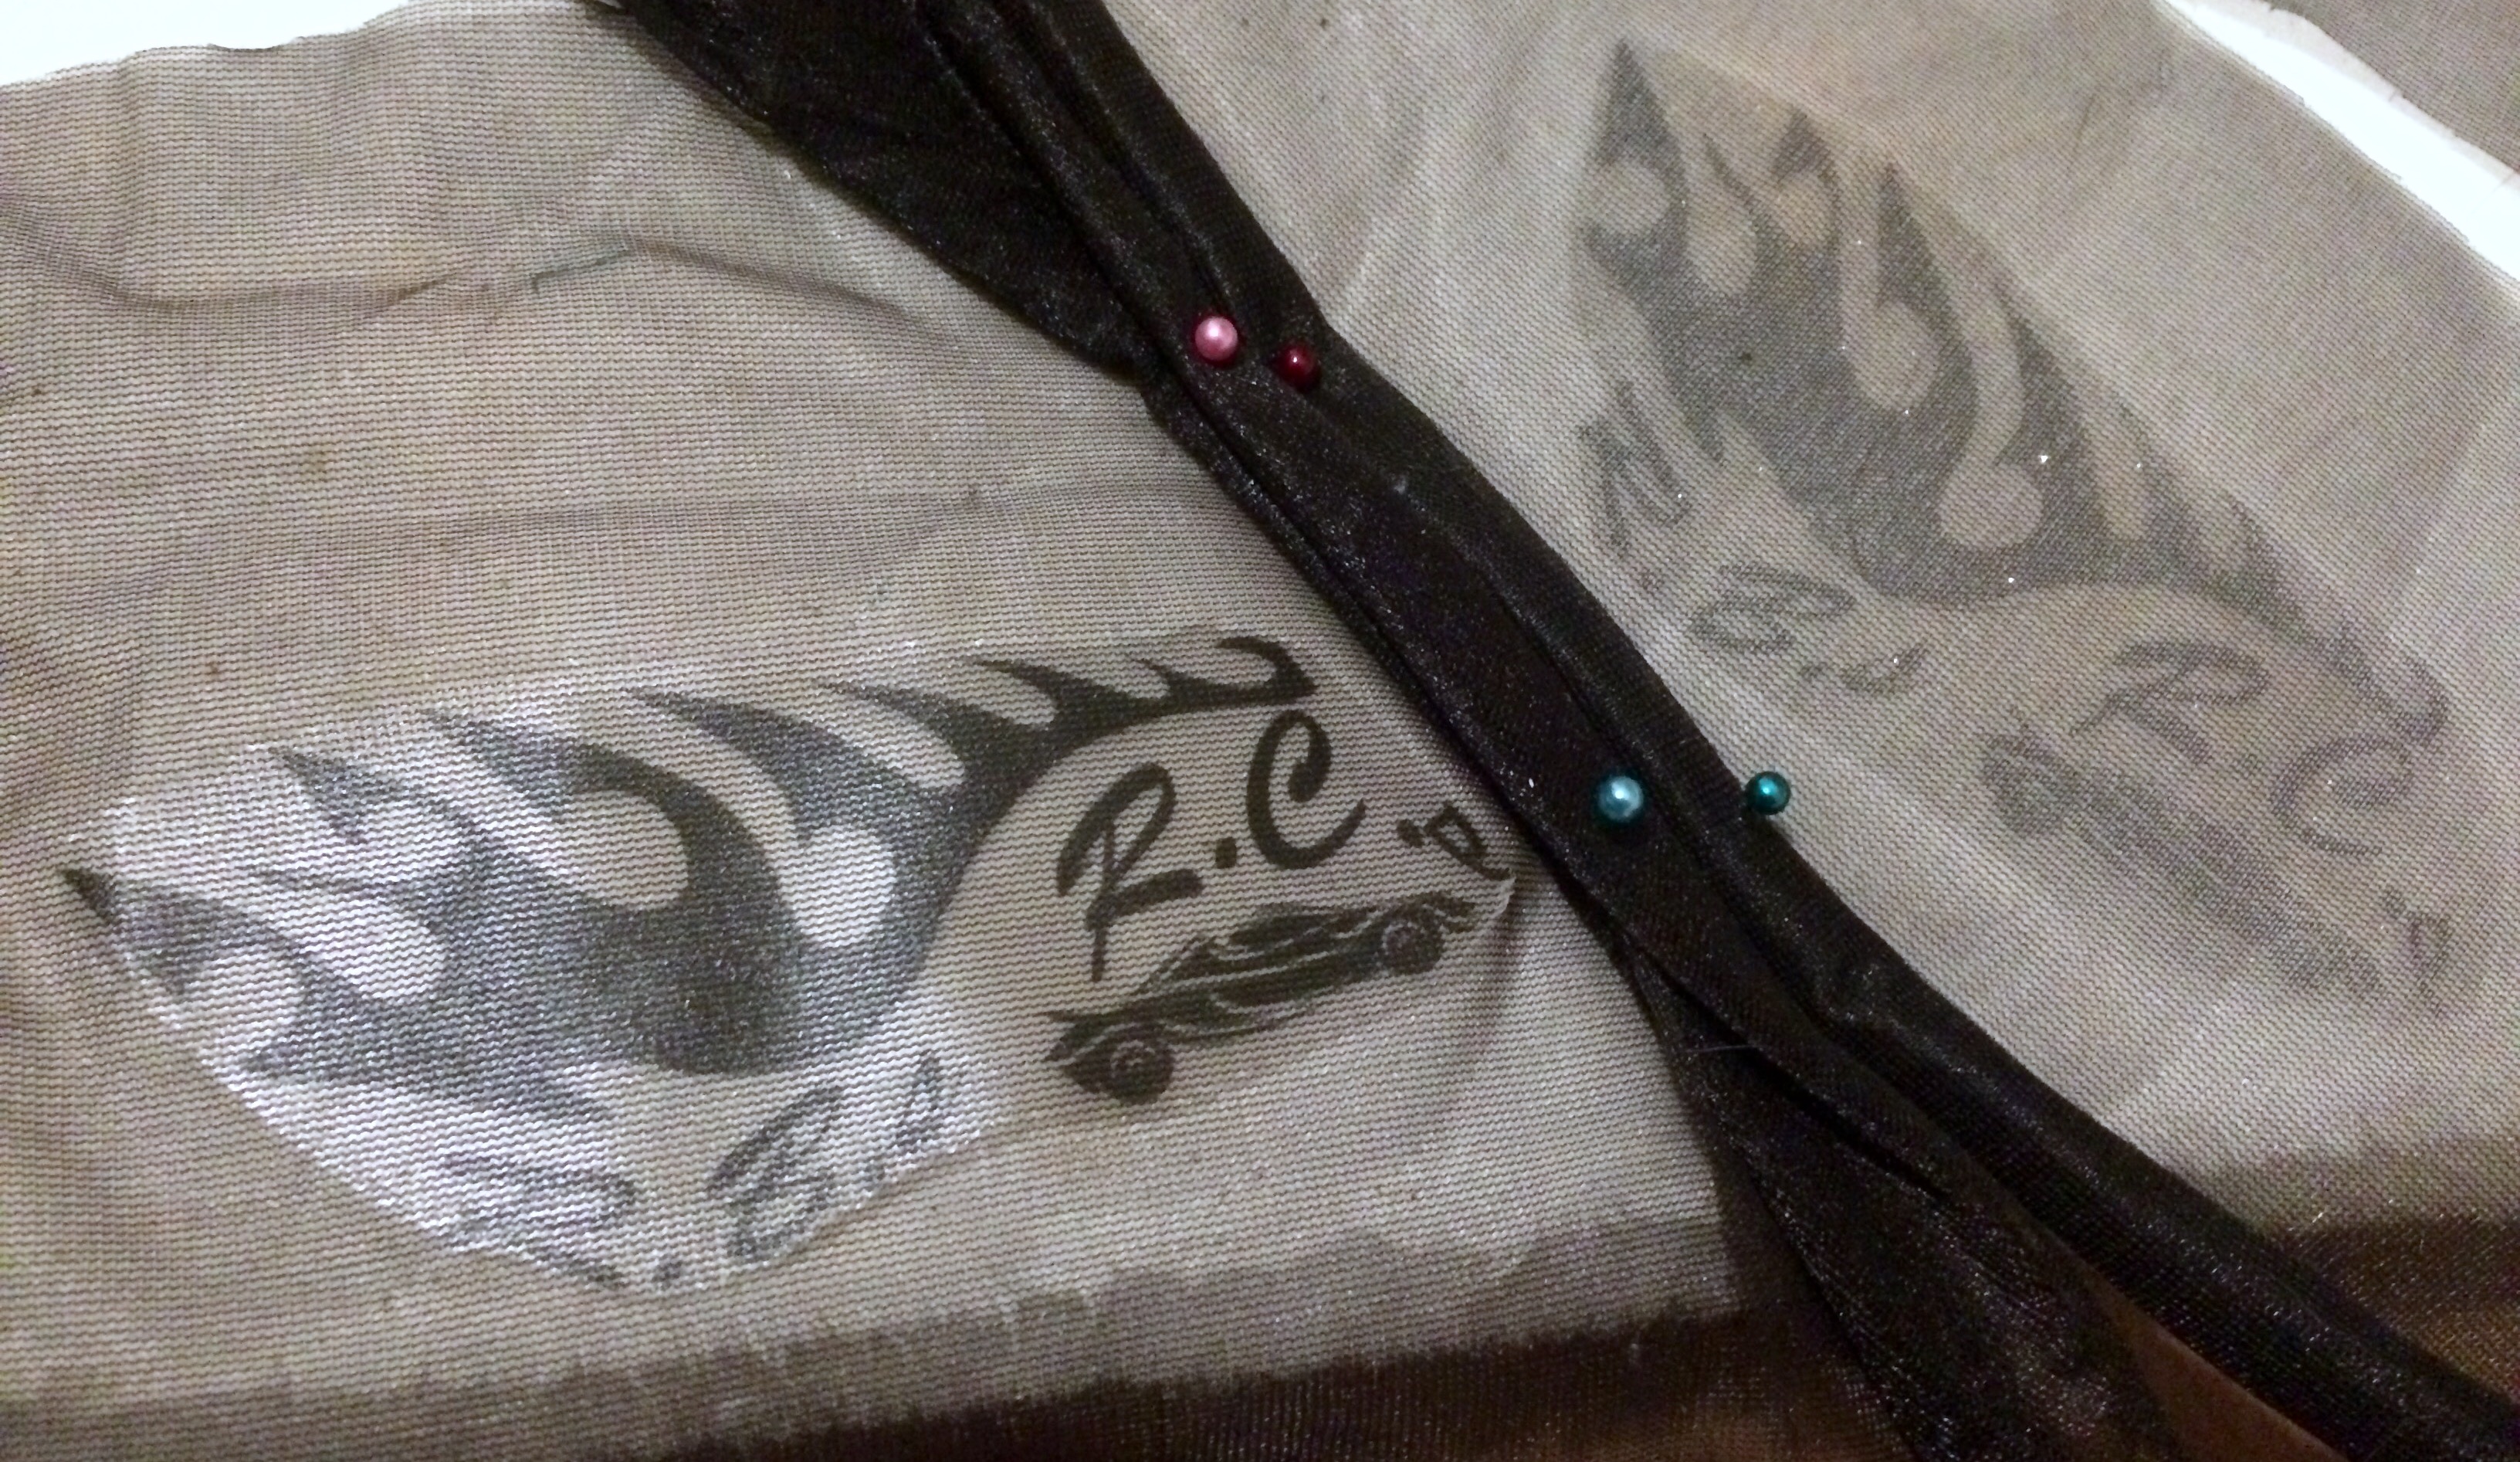
The light background is not really necessary at all if you are just putting a logo or some text on. It’s all relative to what your transferring. Black text will show up well on even mendip dark fabrics. Also the transfers will adhere very well to many fabrics besides cotton. The RC covers I sell are all shades of grey by default and I make lines in mesh, waterproof and taffeta. I’ve created a graphic that shows all of these and some other personal projects I’ve done to give you an idea of what’s possible for these light cover transfer projects. Included are some different colour backgrounds and some shirts I made for us three years ago which have been washed a fair amount and hung to dry on at least 40 occations. FYI I designed this logo and had it printed on a huge sign for Richard for a birthday 3 years ago and it has since become the logo for my business as well. I’m not attempting to really promote it but I’ve attached it to a lot of things over the years. It’s merely convenient that it keeps showing up in this post. However you can check out my website at www.rbsrcs.weebly.com or my easy shop at https://www.etsy.com/ca/shop/RemoteControlCustoms?ref=hdr if your interested.
Another aspect that has to be considered it how and when to pull off the background. You risk pulling up bits of the design or getting the backing too stuck on. Every fabric seems to have a sweet spot, the taffeta’s is right away, the mesh about half cool and the waterproof is about all the way cool. I recommend testing it out before you transfer to your final product if possible. If your not going to test it out first gently and slowly peel back the paper and peek to see how your transfer is going before you take it all the way off if it’s lifting you need it to be warmer it its too hard to peel add heat and they peeling at a warmer temperature.
I transfer the same image time and time again so I print a lot of them out and store them but this isn’t ideal. When they age without being transferred it lowers the quality and the ease at which they transfer. It’s hard to describe really it just gets trickier. If you will have them aging before transfer try not to cut them out until your ready. This is not really a major issue but this is meant to be a comprehensive guide.
Next of to the dark background transfers. These work differently on a few basic levels. firstly these are quite a bit more expensive approaching $4 per sheet and they are ironed on face up with, so the image does not need to be flipped, the backing paper already removed and covered by a sheet of waked paper supplied in the package. Truthfully I really like the result these give compared to the transparent ones discussed above but I’ve only used the Avery brand ones. These have a white background which comes out really striking and sharp when sransfered. If you get a really good seal these wear and wash very well. These can also yellow if you transfer at too high a heat. The package recommends you peel back the paper from the corner gingerly or rip it slightly if your having trouble. That being said it’s the only way I’ve found to remove the backing and I have perfect peeling (kinda long but thin) nails. The tiniest of tears on the edge will do but it may stretch your image slightly. Choose and inconspicuous spot on the edge to start you tear or ideally leave a bit extra in the cutting out step you can always remove the extra peeling tab once the backing has been removed before you transger.

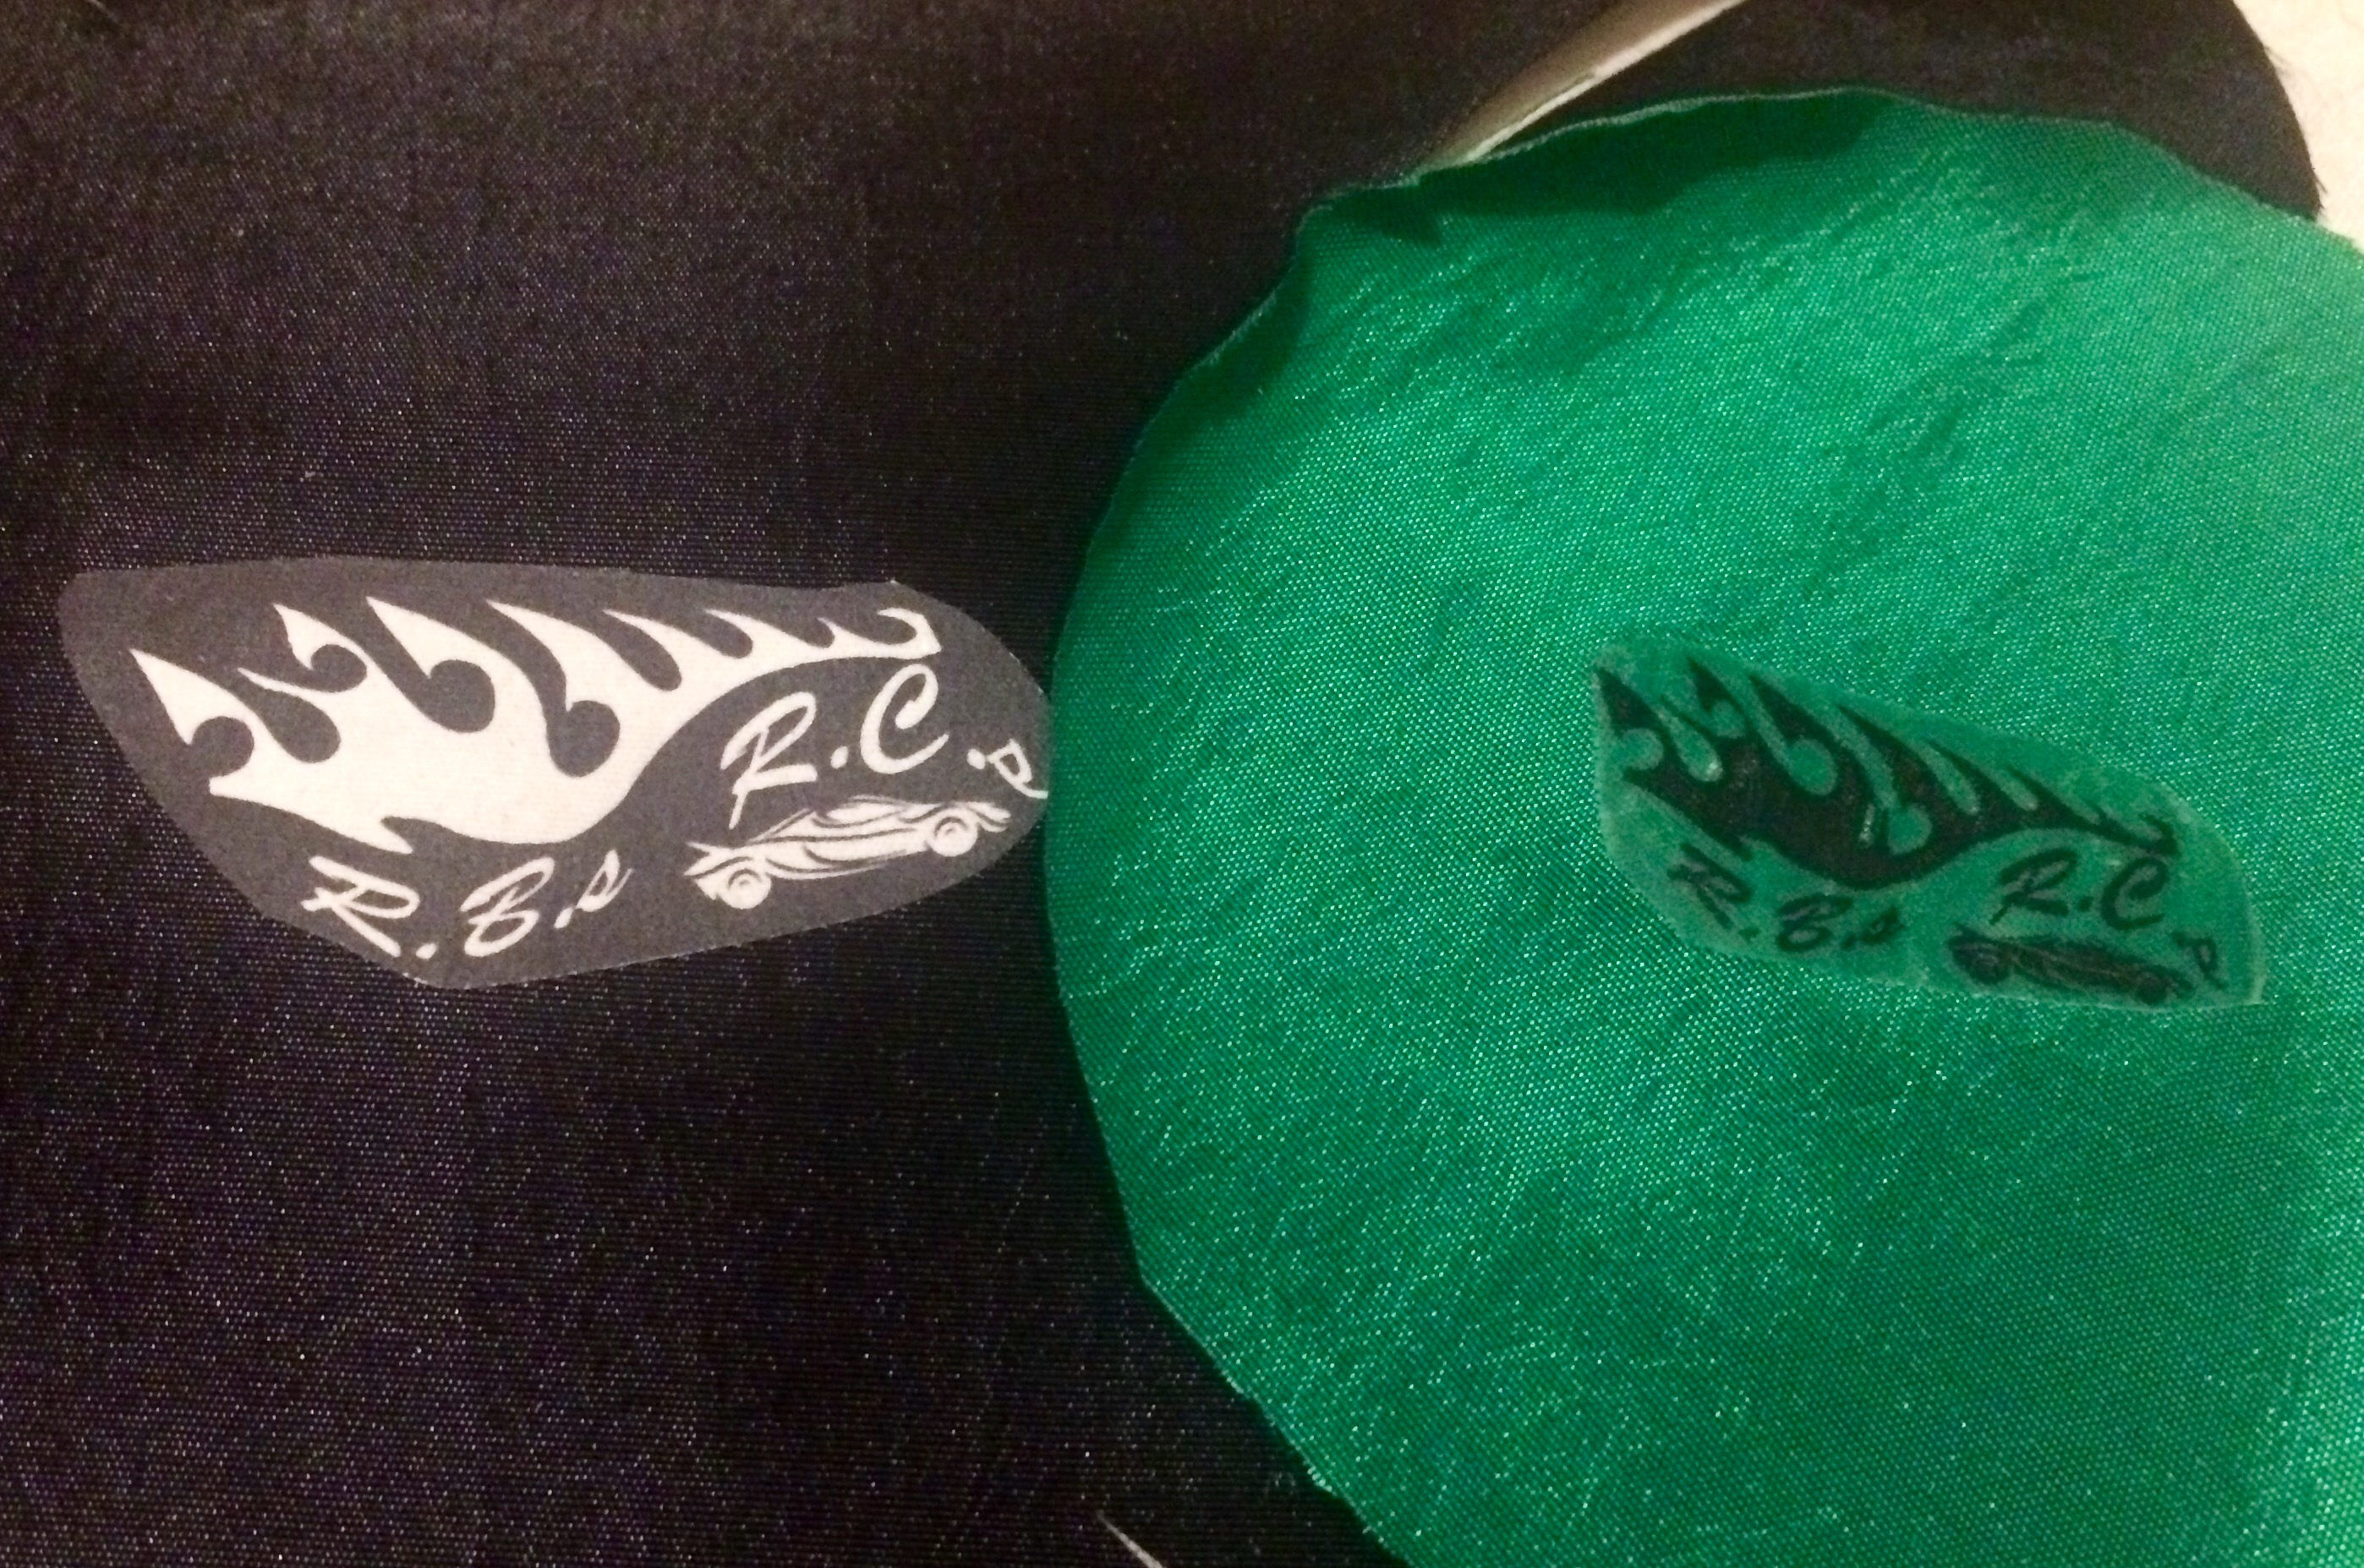
What I use these for mostly is to apply my logo to dark fabrics and have it coming out white. In this case I make the background match my fabric on the computer and leave the logo space blank. Since the transfer is already white the nothing space is my logo and the result is awesome as you can see below on purple covers. I used to use, and sometimes still do us an iron on vinyl for this sort of work but it’s really finicky and not feasible for the number of covers I need.
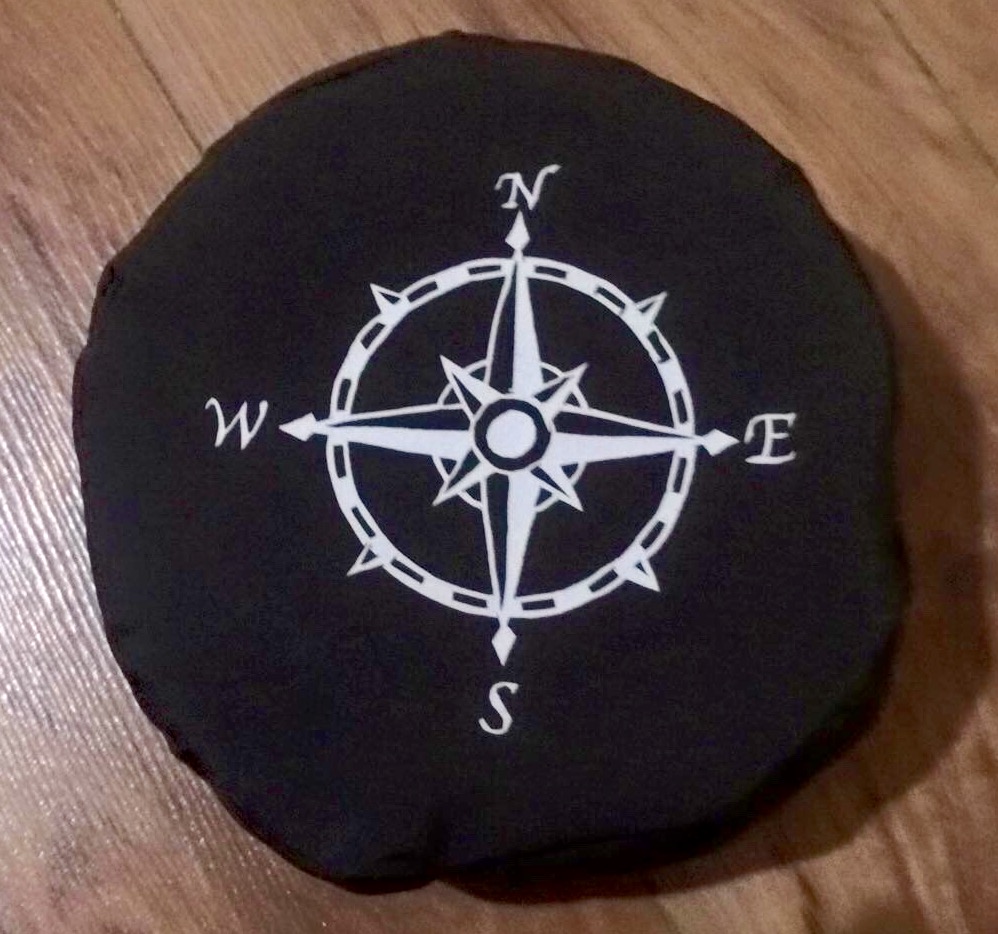
And Iron on vinyl is the last topic of discussion here, something you might not even be aware of. I found this product when I branched out into making custom flags and before I tried out dark background transfers. I still use it where I can even though it’s quite expensive about $15 per sheet with shipping. It’s usually used more commercially where it is cut by special printers, something I don’t have. I’ve ordered it on eBay but would like to be able to find small quantities locally. The vinyl is supplied on a plastic background. I print out my design, horizontally flipped and tape it to a piece of the vinyl with the fransfer side up. Using a sharp utility knife blade and plenty of paper underneath I cut out my design with enough pressure to cut the vinyl but not the plastic backing and peel away the excess pieces with tweezers leaving what I want to transfer attached to the plastic backing. From this point it attaches a lot like a light background transfer. But the plastic is clear so you can see you progress and if a piece doesn’t transfer you can easily apply it where it should be in a second go.
The results are nothing less than fantastic and the result it so versatile and resilient! The picture below is a spare tire cover. It’s held up amazingly well through hours of run time in a very wet and muddy spray. I’ve also included some other images that I’ve used this product on. You can see some of the work I’ve done with this is incredibly intricate and I wouldn’t necessarily recomend that aspect. If you are making a printed T-shirt that will get a lot of wear and washings I would consider this product for sure and it comes in a variety of colours but you pretty much are limited to one at a time.
With all of these products since heat is involved in transferring the image I keep them out of the dryer for best results. Since I scotch guard a lot of my products I apply that after I’ve transferred the image otherwise it doesn’t take the transfer well. Do you have any tips not listed here? If so comment below!
[google0e1df93f469c8b23.html]
