
This year we spent A LOT of time in Peggy’s Cove on a BIG commercial job. It was all hush, hush for the time being but they’re open now and boy did I produce a lot of barn board! Specifically 1200 linear feet of 10” wide boards or 1000 sq ft! While about 1/2 of Pinterest is how to DIY yourself a barnyard wall the instructions aren’t for a very big scale or all that specific in general. We had a lot, a lot to do and in very short order. I figured out a way to get it done, nice and dark in about 18 hours with only an hour of active time, an hour of waiting after that and then it’s ready to hang. I did it over 2 days but if you have the supplies ready and the space you can produce 1000 sq ft in a 8-10 hour day. If you want to do it the authentic way you’ll need about two years and 2000 sq ft to do the same. PS I’ll also fill you in on the chemistry behind the reaction.

What you get on Pinterest
- Get some wood
- Put steel wool in vinegar and leave it
- Make some tea
- Apply tea to wood
- Apply crusty vinegar to wood
- Mechanically distress further with hammers, chains and sanding
Our project
Last summer we spiffed up an existing retail space to make it a candy and gift store for the new owners and at the time new customers. The shop space was covered in this either perfect or nasty old barn board depending on what you’re ecstatic is. We found out in the process of excavating, installing moisture protection, jacking, levelling and adding a ton of structural support to the building that the old barn board was in fact old siding that likely developed that patina over decades. The problem was they wanted the candy store expand, it had to match the old and it needed to be ready to open in less than a month. Had they started aging their rough cut lumber yet? No they hadn’t even found it. So here’s how we got that done and the aged wood didn’t even factor in the overall time line of the project.

Step one: Get wood
Any wood will do with this method as in this process will work to age any wood. What you’ll probably desire the most is rough but lumber. This can be hard to track down since building supply centres don’t sell it and at least here according to code you can’t even use it for framing. Ask around or look for timber mills in your area. The reason you’ll want this is it takes the colour very fast and has that rustic saw mark thing you’re probably going for. We used real 2”x 10” by mostly 10’ planks. But in a few smaller spots that were showing we also used this method on regular 2×4’s and plywood and that worked well just didn’t get as dark as fast or as intensely and required more than one application.
Step 2: Add Iron to steel wool
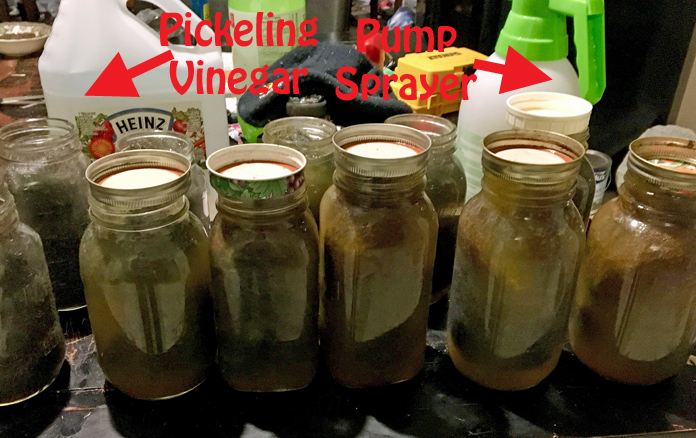
Basically what your going to do is ass steel wool to vinegar. On Pinterest this process always happens in mason jars because pintrest so that’s what I did. I suspect any container would do but in some cases reactions happen best in glass just to be safe that’s what you might like to do too. If you’ve done this in plastic please let me know below. You have to leave new steel wool in at least overnight, which does work. To make it happen faster when you apply it to the wood the darker the vinegar has to be. You’re doing this to basically add rust to the vinegar. To get this to happen faster put all your wool in one jar, (superfine maximizes the surface area and reduces time needed). Then fill the jar with vinegar for about 10 minutes then take it out and let the air at it for about an hour so it can rust. Opt for pickling vinegar if you can since it’s 7% acetic acid instead of 5%. Then partition it out once it’s developed into a rusty colour back into the separate containers, fill them and leave it overnight. Once you’ve used your steel wool once the vinegar takes the steel wool faster and you can get away with less of a soak, the fastest I did it was 2 hours. I put 1.5 pats of steel wool per quart jar.
Step 3: Make some STRONG tea

Sometimes you’ll see a page tell you to use black tea but that’s about it. Here’s the recipe I used:
15 liters of water
20 chai bags
about 300 g of loose leaf black tea (check a bulk food store)
Boil water
Add tea
Boil for 30 minutes
Turn off heat and cover overnight
Recipe can be scaled up or down as needed

Step 4: Lay out wood and get prepared
You’ll want to lay your wood out on planks to get it up off the ground. Pour your vinegar into your sprayer trying your best (or straining) to leave the chunks behind so they don’t clog it. You’ll need a roller for the tea, we just dunked it into the pot. We picked sunny days above zero but just barely. We also tried not to apply the mixtures to wood that had ice on it which isn’t a bad idea.
Step 5: Tea Time
Apply two coats of tea with a roller. You don’t really have to let it dry completely just let it get good and soaked in after each coat and before going on to the next step. For reference one one occasion we tea-ed a lot of boards and then stored them inside before we added the vinegar a few days later and it worked perfectly. If you’re somewhat careful with drips you can expect this to cover about 800 sq ft. Make sure to hit the edges if yours will be showing
Step 6: Vinegar time
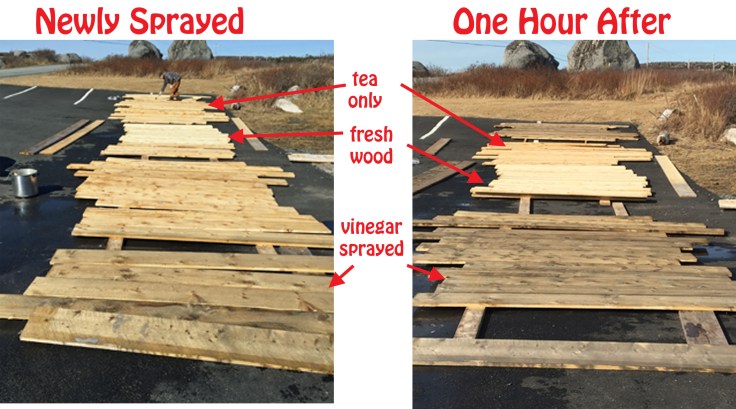
You can expect each quart jar to cover about 10-15 sq ft a bit more if you roll the vinegar on. If rolling you’ll use a bit less but it takes 2 applications to equal the depth of colour as a spray. When spraying apply generously so that the wood is visibly covered. The colour will start to develop immediately but reaches is maximum wet colour in about an hour. Overnight as it dries it will colour more deeply. Applying more vinegar doesn’t really change the colour after that. In order to deepen the colour add more tea coats. It can be good to test a board before hand to make sure you’re happy with the final colour. We found that when the wood is wet and until it completely dries a couple of days later it can have a green tinge but that eventually goes away and it turns grey.
Step 7: Install or distresses further
We didn’t distress the wood further but you can by adding nail (worm) holes, hitting it with chain, gouging it or sanding it. Once it’s dry enough it’s ready to install but depending how green (fresh) it is it might shrink considerably. If that’s as far as you’re going it’s ready to install. We installed most of ours after three hours a few pieces a lot sooner.
Step 8: Touch Ups
You might find that your wood shrinks, you want to cover screw holes or generally get a little OCD. You can touch up with tea and vinegar on brushes after that.
How it works: Chemistry
Basically it’s a speeding up of a natural process which is the oxidation of tannins. When you leave wood outside the UV light and weathering oxidizes the small amount of tannins in the wood naturally but it takes a long time. Black tea is of full of tannins and adding vinegar speeds up the reaction by providing acidic conditions the Iron in the steel wool also speeds up the reaction by acting as a catalyst.
Have you ever aged barn-wood? Do you want to? What’s your favourite barn wood project?

Leave a comment