We all want to take better pictures no matter what camera you have, even if that’s the one on your phone. These tips are truly easy, not switch to manual mode and extolling the virtues of manual focus. With summer (supposedly) around the corner you might want to get the prefect beach shot, landscape, flowers in your garden, item pictures for eBay or document an important family occasion. Whatever shot your after make sure it’s profile perfect with these tips that you can imliment right now. I’m no professional but it is a hobby of mine and I’ve gotten to be the go to for family occations.
1. Get closer to your subject and fill the frame.
If you are taking pictures of a group of people don’t worry about the surroundings and fill the frame as much as possible with your group. Even if they are standing on the edge of the Grand Canyon get in closer because the shot really is about the people. If your going for a shot of a pretty flower in your garden is it the stem your interested or just the bloom? Secondly, move don’t zoom. Whether your shooting with a dSLR and a zoom lens or pinching to zoom on your phone, you’ll likely be happier with the result if you move closer to your subject rather than zooming in. Zooming in maximizes your subject in the frame but it also maximizes shake leading to fuzzy out of focus pictures. Overall your pictures will be crisper and sharper. Don’t be afraid to crouch down or stand on a chair to accomplish this.
2. Photography is really about light
Think about the light when your setting up your shot. Now that’s a loaded sentence, lighting a shot correctly is why you are paying a photographer big bucks and entire volumes have been written on the smallest aspects. So here are some take aways that are easily implemented. Our eye/brain combination is incredibly sensitive to taking in and interpolating images in an almost impossible range of lighting conditions. No camera, even one that costs many thousands of dollars will ever compare. You’re probably shooting in auto mode and that’s totally ok, if you have the option ALWAYS add more light, cameras making lighting decisions make those decisions better in more light. You can always take some away if your looking for a darker option.
Take shadows into account, chances are you don’t want them in your image. If you want to get rid of one you have too options, try the flash or rotate. Remember that you already got close so your flash might be enough to get rid of it or at least minimize it. If possible spin your subject and yourself around then until you find a shadow free shot.
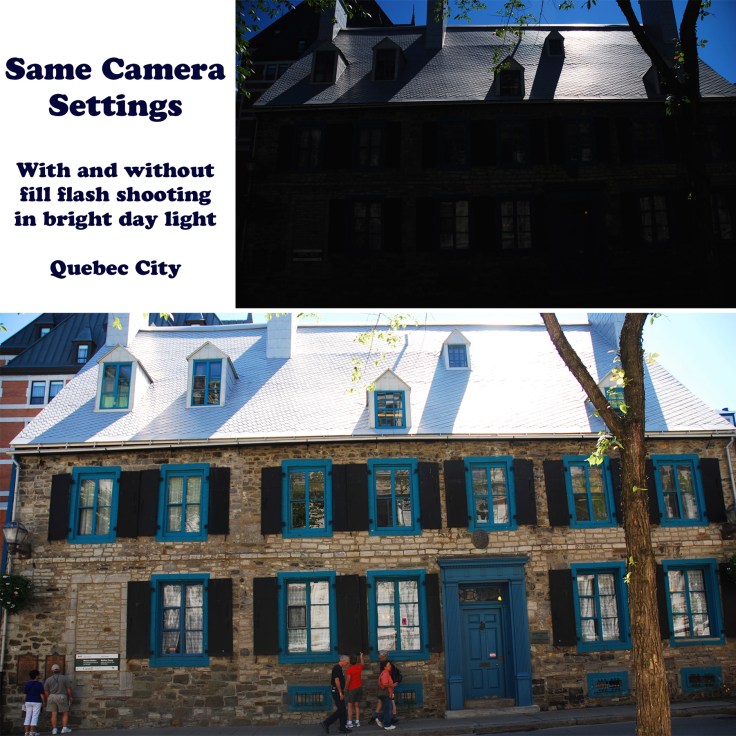
If your taking a shot in the full sun your subjects will look great if you stand with the sun behind you but they might be squinting. You can try reminding them of this and encouraging them to open wide. Alternatively turn the whole situation 180 degrees and but the sun behind your subject, in this case you are at risk of casting a shadow on your subject it so perhaps step back or step to the side. If not try the spin trick or look for shade, you’ll usually be happy-ish with a picture shot in shade. An hour after dawn and and hour before sunset is called the magic hour. Something happens with the light and the results just seem magical. Get out there and give it a try.
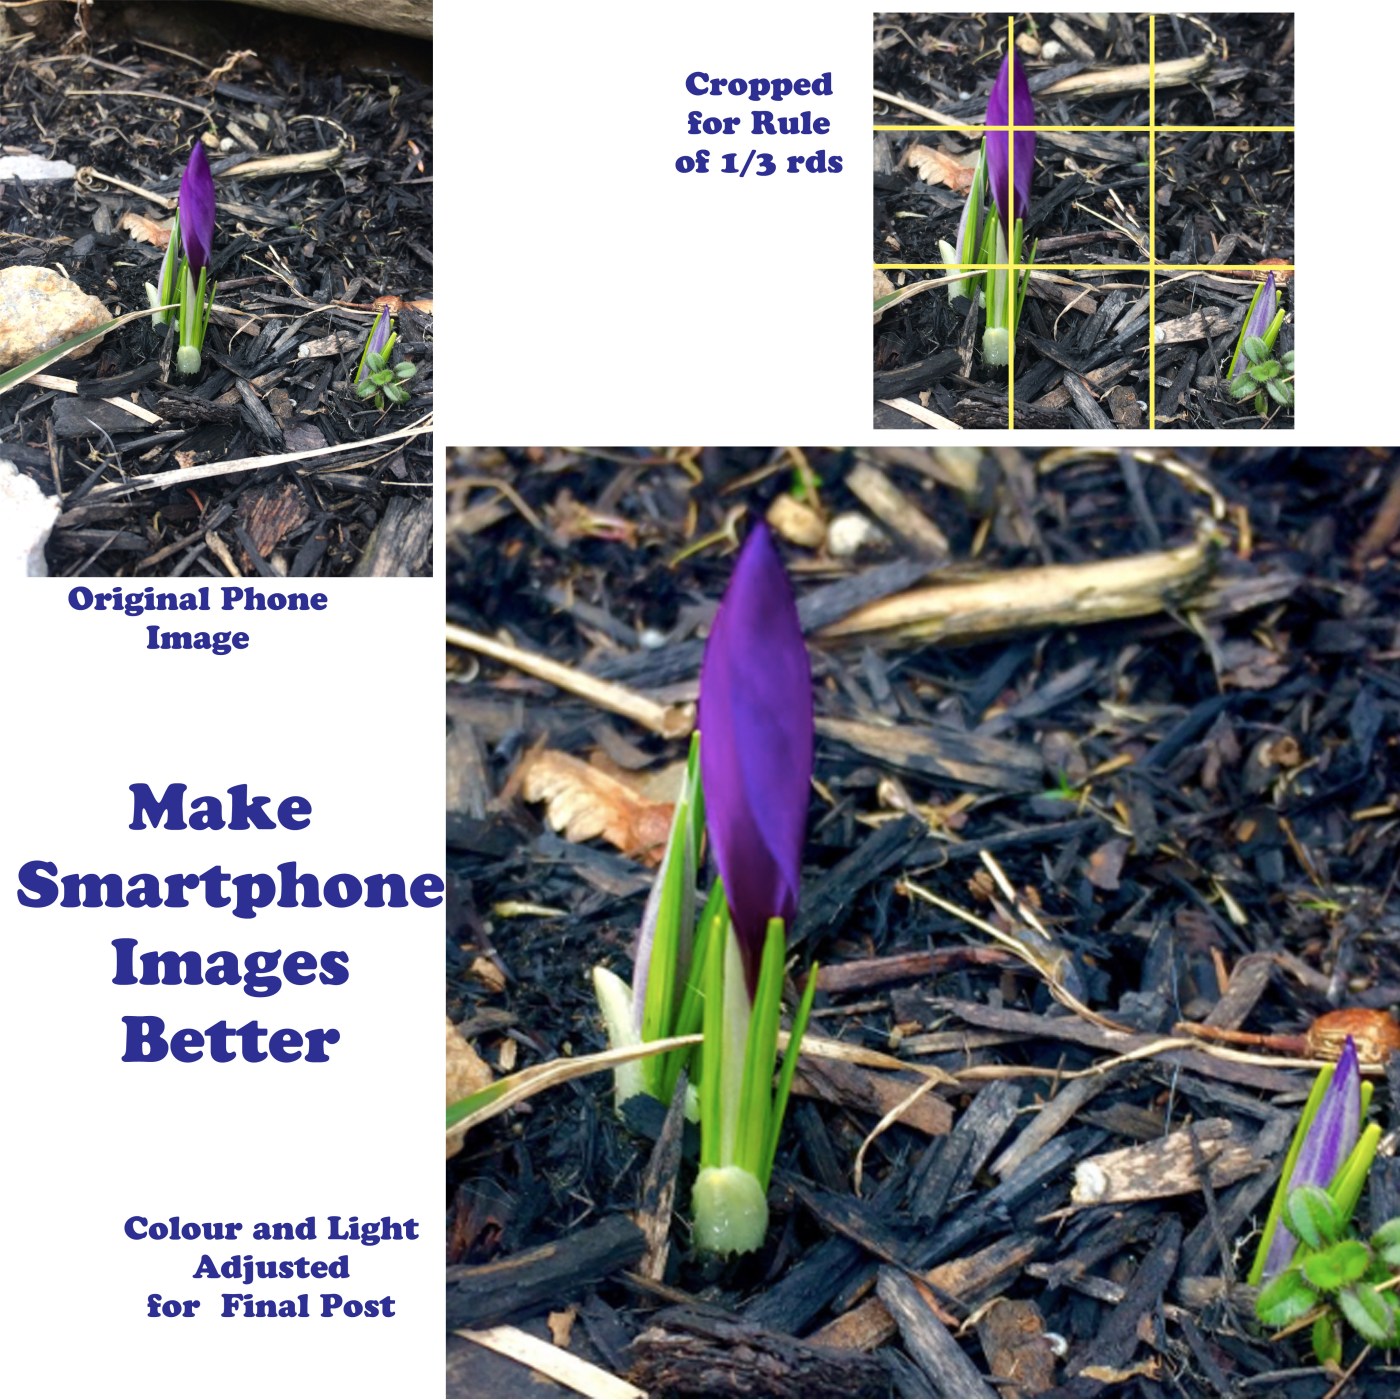
3. Be aware of the rule of thirds especially of your going artsy
Now this is a rule that’s totally breakable but it can go a long way to making your shots look more interesting. You might have heard this advice before but let’s talk about what that really means and how to implement it. People will naturally look and focus at the intersection points of the rule of thirds grid, they will also find the image more pleasing if there is something there to look at. Placing a particular focal point you want the viewer to notice at the intersection point and they will look there.
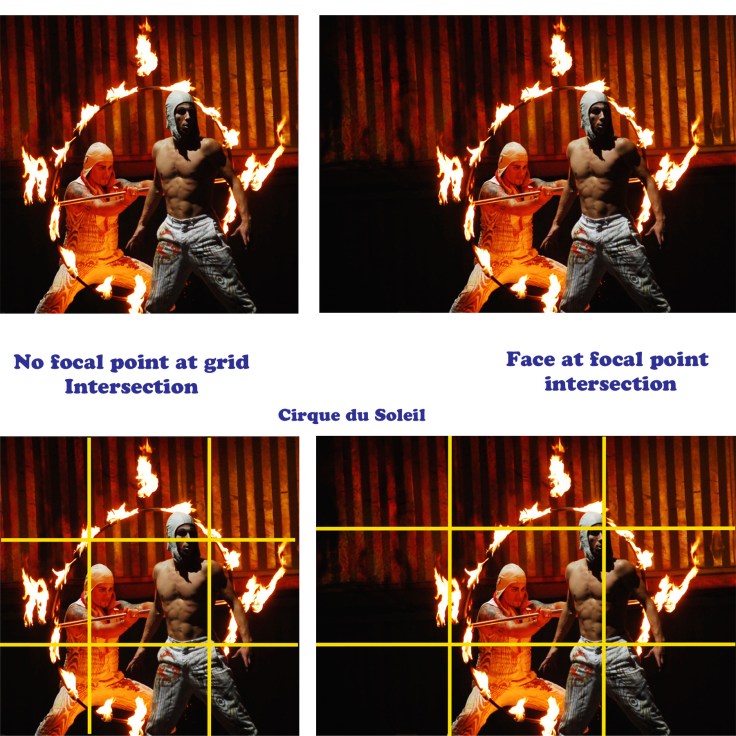
By not placing your image of a flower or friend jumping dead centre in your image it will read as more artistic and interesting. Placing the horizon line of a landscape on the top or bottom line, depending on your emphasis (land or sky), it will be more pleasing to the eye. The best portraits tend to have the eyes of the subject in the top two intersection points. But… it’s weird to have a group of people anywhere but the middle and breaking this convention can prove striking as well.

4. Watch for distractions
Nothing ruins a great picture faster than a telephone pole that seems to be shooting out of someone’s head. You can take it out later on the computer, depending on the programs you have access to. Either way it’s easier if you just move everyone down to avoid it.
5. How to get shots that are true to colour
Sometimes it’s really important to get shots that are true to colour, like when you are selling something on eBay. I seem to have a hard time getting reds and vibrant pinks to shoot true to colour. You have three avenues to explore and if your having a really hard time with a colour try all three. One easy one it to turn off the flash which tends to wash out colours. If you need it for light consider breaking rule one. Back up and zoom in so that less light lands on the object and the colours are more vibrant. Colours seem to photograph best in bright, natural sunlight so take your picture outside on a bright day if getting the colour perfect is your goal. If the colours are still not coming out quite right you have the option of playing with your white balance but probably only if your using a camera and not a phone. When you take a picture the camera makes a guess about what white is, depending on the lighting conditions and it usually does a decent job. This then determines how all of the other colours read in the image. If your not getting the right colour you can override the camera’s decision. Google how to set custom white balance on —– (your camera model). Basically you enter the proper part of the setting menu on your camera and take a picture filling the viewfinder of a white or grey object. You can buy a special card for this but a piece of printer paper works fine too. This lets you tell your camera what to read as white under that very specific set of lighting conditions for all of the subsequent pictures you take. But this might get reset if you turn off your camera and you will have repeat the process, so leave it on until your done! You also have the option of playing with the picture using editing software later by adjusting your colours or cast but the best results come from setting it in the camera.
6. Watch your angles
Generally its a good idea to get on the level of things you are taking pictures of. So if your taking a picture of your kids, crouch down. If your well above or below your subject it messes with your perspective. Think about shooting a tall sky scraper from the ground, the bottom is wide and the top is skinny. That being said breaking this rule is an option too. Shooting from above or below can totally change the look of your subject and potentially make it more interesting. Also shooting people from above can be very flattering. That’s why you hold your phone up when you take a selfie. Avoid shooting people from below as it can give the thinest and fittest of supermodels double chins. If you are shooting a group of people consider standing on a chair and having them look up at you. The parts of your subject that are closer to you will look bigger and the further parts will look smaller and de-enfisized. That means the faces in your group will be the focus and people’s bodies will seem smaller and people usually like that! don’t push this too far though because if you shoot from too high an angle people will start to look like bobble-heads.
7. Take some time and get bossy!
If you are taking a picture of a group of people channel your inner boss! Take some time to scope out a shot and be prepared to holler at some uncooperative people. You may need to move some people around so you can see everyone’s face or get some people to crouch or stand on their tippy-toes. People complain and moan about having their picture taken at the time but years later look back on it fondly and treasure it as a memory. If need be remind them of that, loudly!
8. Buy a remote
There is a remote made for every camera and you can even get a bluetooth one for your phone. They improve your pictures so much and they are so cheap! Using the self timing feature doesn’t usually give you the best results. Even if you make it into the frame in time sometimes people are looking at where you just came from rather than the camera. Do you have lots of pictures of your kids on your phone but none with you in them too, a remote can change that! A Bluetooth Selfie Remote like this one claims to work for all smartphone models and costs less than $10. I have two for my Nikon
d60 one older one that works fine for my camera and flash when it’s on the hot shoe and one newer one I ordered from eBay for when I use my SB-90 flash off of the camera, all totalled its less than $40 invested. There are ones available for canon
cameras too. I would consider buying one for your specific brand of camera if you can but if not there are remotes available that claim to be universal
to many different models of cameras. This way you can stand in your shot and trigger the camera from inside the shot, over and over to make sure everyone has their eyes open in at least one.
9. Make editing part of the process
Many purists might claim that they don’t edit or only use natural light and that’s cool. The major advantage of shooting digital is the ability to edit photos easily after the fact. It’s totally true that you’ll have less work later if you get things close or perfect in the camera but that’s not always how it works out. Perhaps you are shooting in manual with the settings off of where they should be, directly into the sun or in low light when a once in a lifetime shot happens. It might be lightning in the background or once I took a picture of a deer crossing a busy city street at deer crossing sign, they ended up too light and too dark respectively. Had they been digital pictures I might have been able to save them in post.
There are some pretty cool options for editing on most phones now too. You can adjust the exposure, highlights, shadows, contrast, saturation and colour casts right in you phone and improve a shot that otherwise would have been deleted and make it something really special. One of my favourite photographers Ken Kaminesky says that the best camera you can have is the one that you have with you, he’s also a big fan of the possibilities of editing. When you see the perfect shot when you don’t expect it, your phone is in fact the perfect camera, even if your still rocking a 4s. Editing can make it better if shooting conditions aren’t ideal.

You might already have software on your computer that can take it up a notch too. I still use iPhoto but the newest iteration is photos on Macs. These replicate the controls in your phone with even more functionality including the inclusion of a retouch function. This can let you get rid of that telephone pole, maybe. What it can do is let you give your subjects digital facelifts and everyone likes that. Fine lines, wrinkles, blemishes and under eye circles can be easily dealt with in this free software package so go investigate!
Now, you might want to do more than iPhoto or another free software can do. You can defiantly use the clone stamp tool to get rid of even prominent objects, change lighting completely, remove all but one colour or add text to your images I suggest Adobe Photoshop Elements 15. It has a lot of the functionality of full photoshop but with a fraction of the price ($70). That being said with great power comes the odd headache, that’s a saying right Photoshop Elements comes with a learning curve, that’s for sure. I find there is almost always a great youtube video that shows you how to accomplish your goal in elements. Often it’s the same process for full photoshop so those videos can be a resource too.
If you want to take your photos to the next level consider upgrading to elements. Its about all you’ll ever need for blogging but if your a new parent or grandparent, designing your own wedding stationary or something similar now might be the time. I bought Elements 9 in 2010 on CD, installed it on my MacBook Pro and recently switched over to an air in 2017 with no CD drive. After failing to transfer it myself I called customer support and giving them the jewel case number they provided me with a link to download it, sweet. So it’s probably a one time investment!
I hope this helps you with your photo game. Do you have any easy photo tips that took your photos to the next level?
